ANIMATICS AN INTRODUCTION TO ADOBE PREMIERE PRO
GETTING STARTED
If you don't already have the free Adobe software UC Berkeley provides for students, please download that here. Once you've downloaded Adobe Creative Cloud, please install the following programs: Adobe Premiere Pro and Adobe Photoshop (the latter of which you may choose to use for the next lab). If you need any help with any of this, feel free to shoot us an e-mail at adfa@ucbugg.com, and we'll get back to you as soon as possible.
We're expecting something like this by the end of the lab:
Password: adfa
FOR TRADITIONAL ARTISTS: SCANNING YOUR STORYBOARDS
If this is your first time doing this lab, you probably don't have your own storyboard yet. In that case please use this sample excerpt from a storyboard to follow along with the exercise. There is no single "correct" way to time these boards or add sound, but use this lab as practice for timing out actions in way that feels cohesive and realistic.
Later into the semester, when you begin making your own animatic, some of you will have your boards on paper. You need a way to transfer the drawings you have on paper to the screen. To do so, make sure you have an access to a scanner. If you do not have a scanner, there are many libraries, if not all of them, that own scanners. However, if you are on a tight schedule, please make sure to simply take clear pictures of your boards and be certain that they are easy to see (i.e., if your pencil lines are light, we want you to ink over them with pen or darken your lines).
For more info about editing traditional art, please consult the Intro to Photoshop Lab.


1.png


3.png
2.png

4.png


6.png
5.png
Again, whether you are scanning or taking pictures of your boards, please make sure your drawings are clear. They should each be an individual image file on its own.
USING PREMIERE PRO: OPENING UP A NEW PROJECT
Whether you're working traditionally or digitally, you should have individual image files for each of your storyboards. One board, one .png/.jpeg file.
So, it's time to open up a new project on Premiere Pro.

Rename your new project with STORYTITLE_Animatic. Change the "Location" of your file as needed. Make sure to set your new project where your video format is on Timecode, audio on Audio Samples, and capture on DV, like so:

Before we get started, you want to make sure your workspace is in Editing mode to make your life much simpler and be able to follow this guide a lot easier. This is one of the default workspace presets that Premiere Pro provides. To check if your workspace is in Editing mode, you want to go to Window > Workspace > Editing.

Now you want to create a new sequence. In a nutshell, sequences are a series of video clips that tell a narrative. Because we are only creating one story and not a feature length film, I'll be creating only one sequence.
You can scroll through your Sequence Presets and experiment with the different presets on your own, but for the sake of this lab, I'll be using HDV 1080p24, as it is the standard size for movie files.

Name your new sequence as you wish, but I'm going to keep mine as "Sequence 01," because I'll only be using one sequence anyway. Clicking "OK" should create the sequence under your Project file.

Now that you have your sequence created, you can import your images. To do so, go to File > Import. Do not import your images as an Image Sequence; instead, select all the images you're planning to include in your animatic and import them together.

You'll notice that, in your Project file, where "Sequence 01" was located, there are now all your image files all in one place. Let's drag the files into the video sequence into your Video 1 (V1) track. Your layout should look like this now:

If you are unable to see the pink strips of each image clip, don't panic! You'll just have to drag the scrollbar located at the bottom of the sequence inwards. (To drag it outwards is to zoom out of the sequence).
FAMILIARIZING YOURSELF WITH THE INTERFACE
Now that you have your images imported and you've used the scrollbar to zoom in on them, you might want to get faimilar with some of the main tools I'll be using for this demo.

Starting from under "Sequence 1 / 00:00:00:00", notice how I have the Snap (the magnet symbol) tool turned on. You can turn this on/off as you wish, but I prefer it to be on so it snaps to a certain second. You may find it useful to turn it off if you want to be extremely precise with your timing.
On the left, you have your toolbar; the first being the Select (V) tool, which simply selects any video or audio clip(s) as necessary. Two tools under that is the Ripple Edit (B) tool, which allows you to manipulate the length of each clip while pushing the others away, like so:
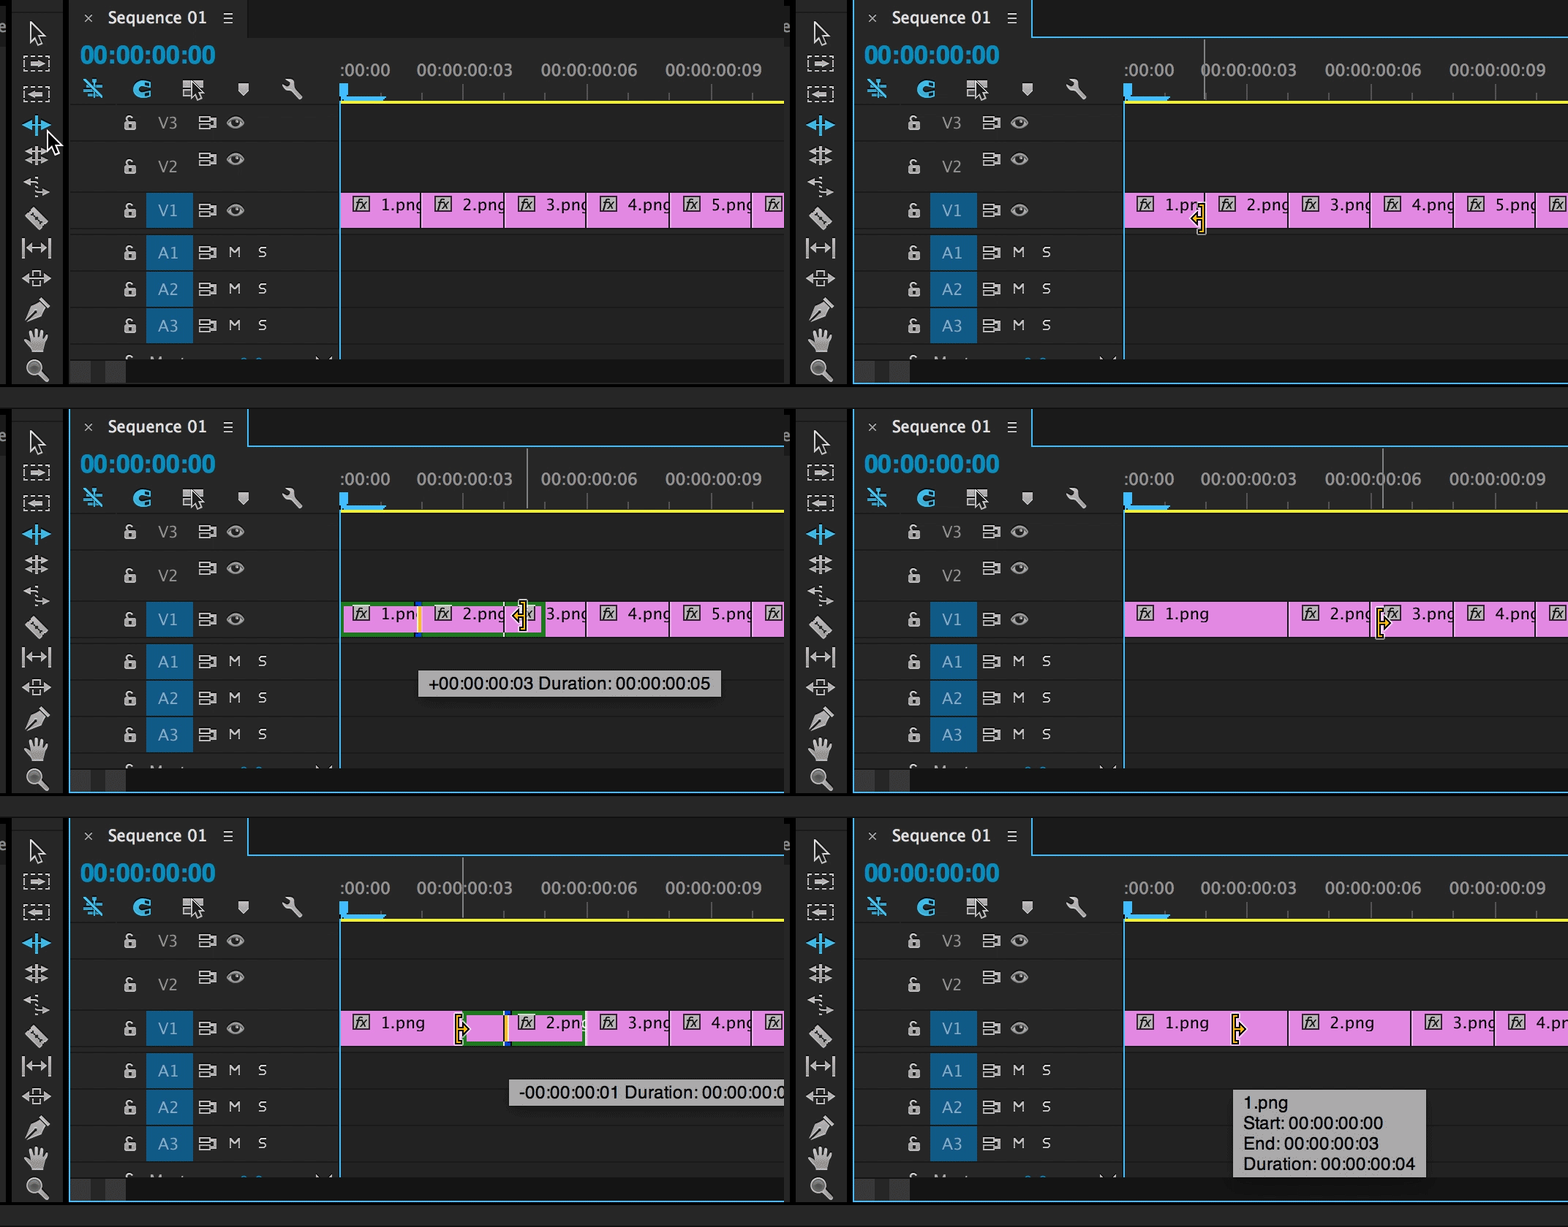
Another two tools under the Ripple Edit tools is the Razor (C) tool, which is extremely helpful in cutting up audio. I primarily use it to split my audio at a precise time and delete the extra audio.
If you would like a fade in/fade out effect, you can use the Pen (P) tool, where you can create two points in your video/image file and make a slope, as so:
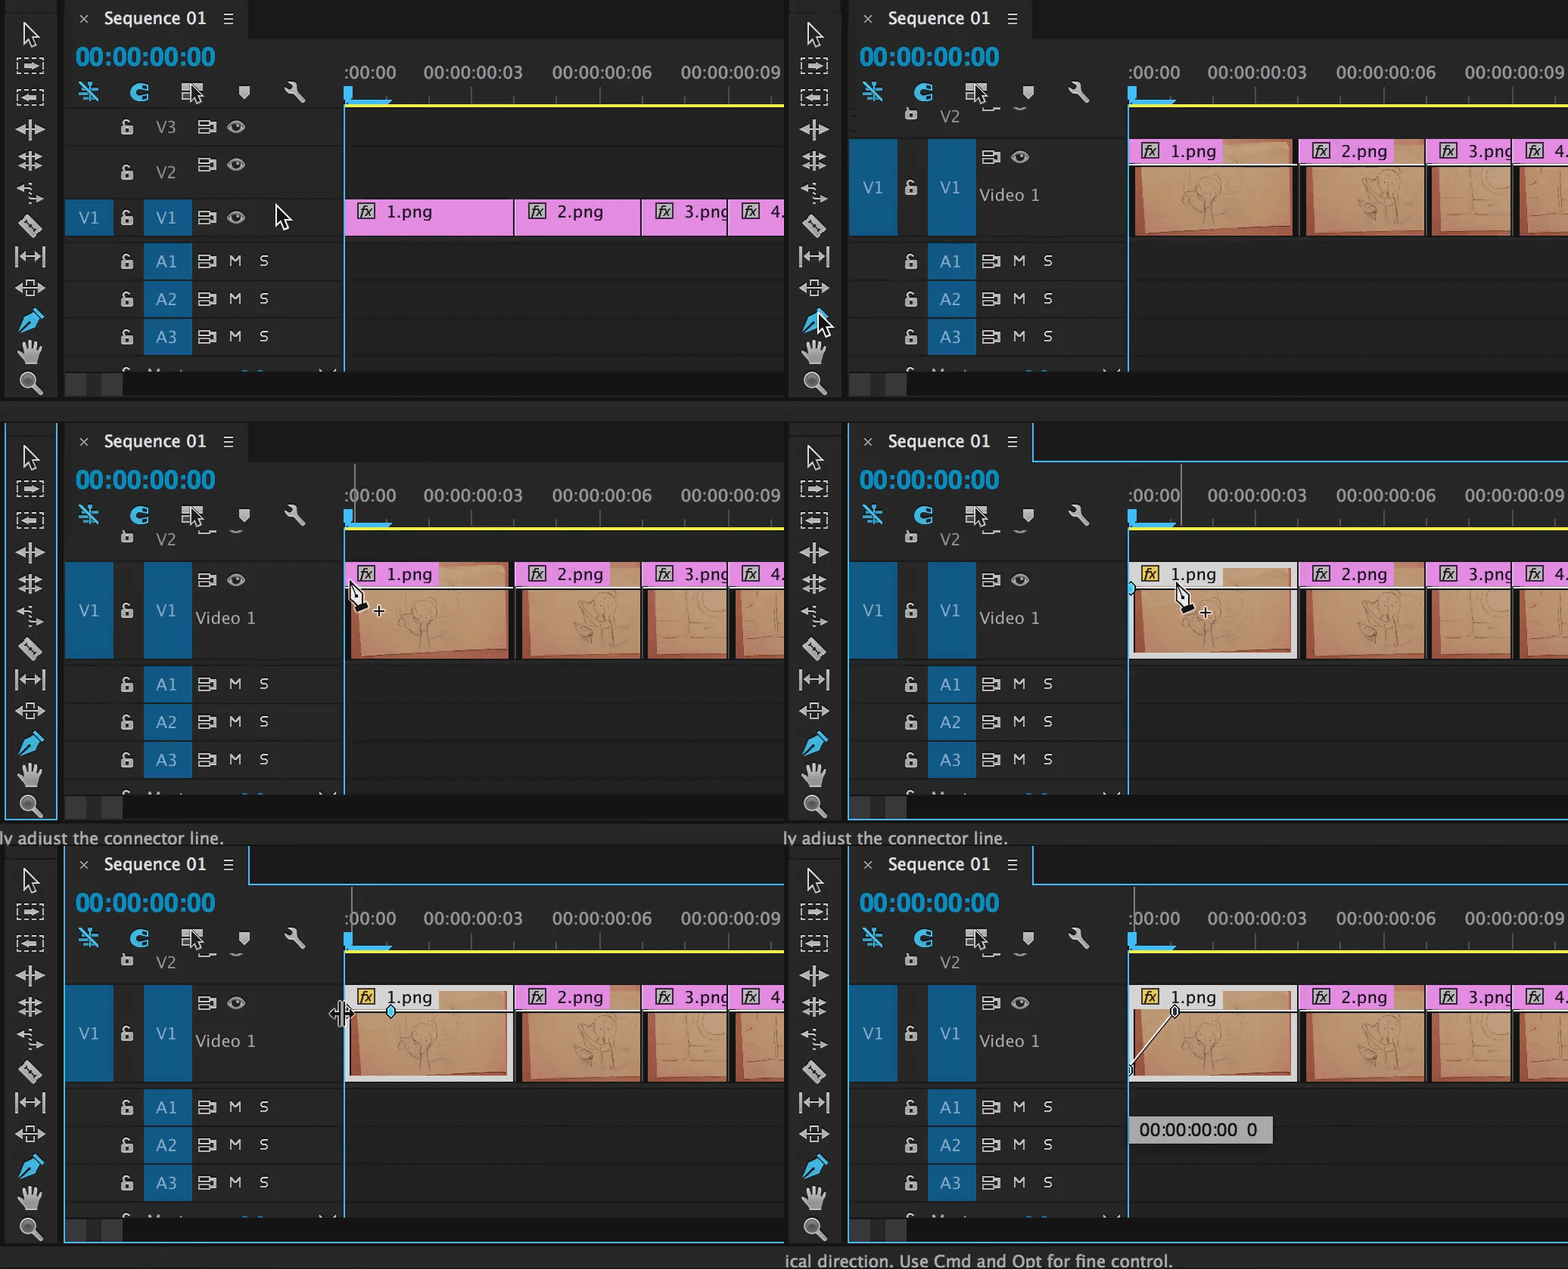
Note that I was able to expand my video clips vertically by hovering over the V1 layer of my sequence and scrolling my mouse upwards.
Essentially, what I did with the pen tool was add "keys" on the opacity of the image at a certain time, thus creating a fade in.
My 10-second animatic (for my 10-second film) ended up having a variation of timing--as yours should also have-- that looks like this:

Adjust the time of your image clips as necessary in order to convey your story, checking each scene's readability and making room for anticipation. Expect your story to be longer; remember that your minimum is 2 minutes and your maximum is 3.
EFFECTS: ZOOMING & PANNING
Above, I briefly described how to create a simply fade in/out effect. But, if your story is more complex and includes zooming in/out and panning left/right in scenes, this is the section for you. If you are following along with the example storyboard, the first frame should start off zoomed-in on the "Mixed Paper" text and gradually zoom out to the full image (denoted as "pan out"). The character then looks to the right, prompting a pan right immediately after the zoom out.
Before we begin, you may notice that, at the top left of your workspace, there are a few tabs. Click on an image clip you would like to add an effect to, and click on the "Effect Controls". You should see something like this:

To pan and zoom, I want to focus on the fx Motion tab.

ZOOMING IN/OUT
To depict a zoom into your scene, you want to manipulate the Scale tool. What I did was create a key frame by clicking on the Stopwatch symbol (the "Toggle Animation") at the very first frame of the image, move to the very last frame of the image, where I want the zoom in to stop, and increase value of the scale (as I want to zoom in; if you wanted to zoom out, you would want to decrease the value). Premiere Pro automatically creates a new key frame once you change the value of the first key, so you won't have to worry about clicking on the "Toggle Animation" button again.
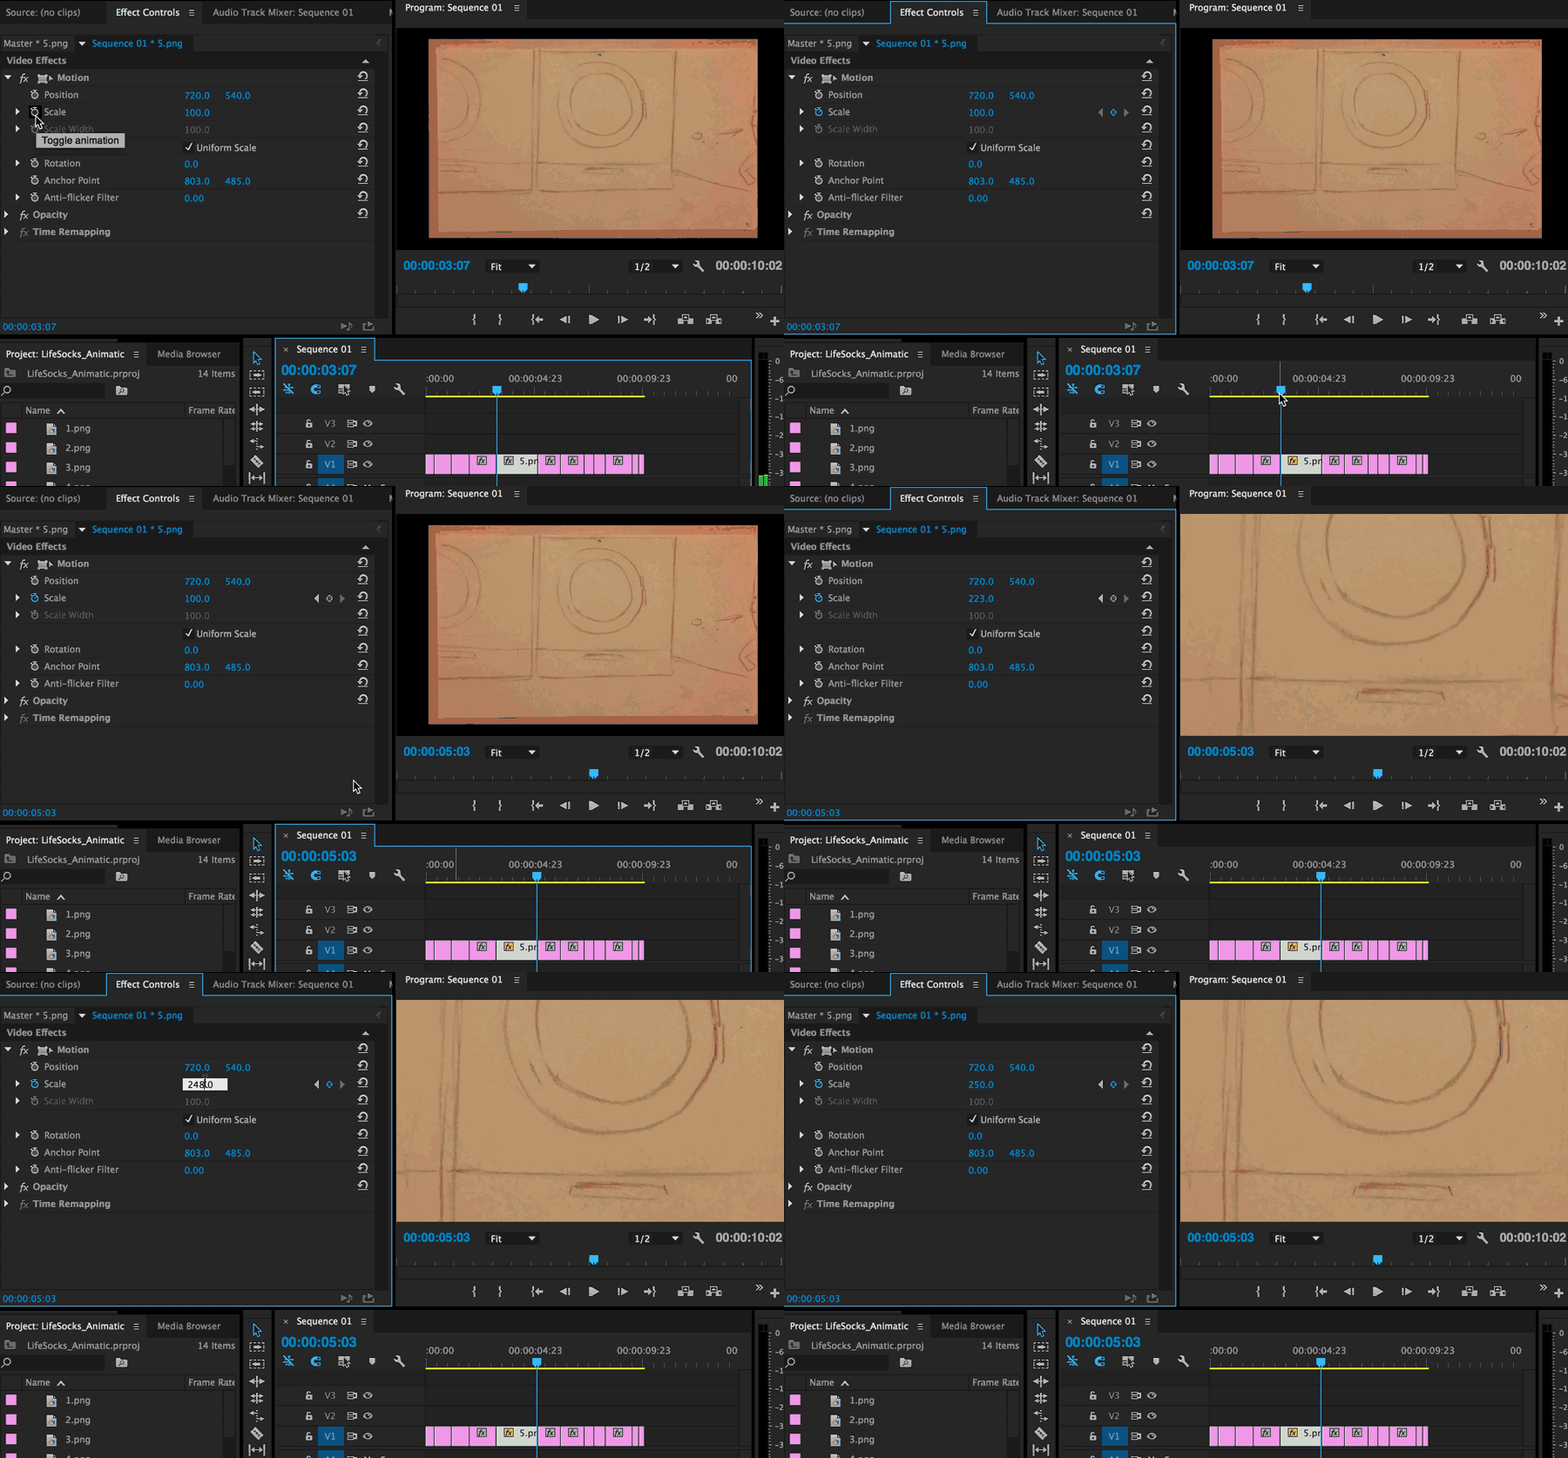
PANNING LEFT/RIGHT (or UP/DOWN)
Similar to how you manipulate the Scale tool, you would want to use the Position tool to create the panning effect as so:
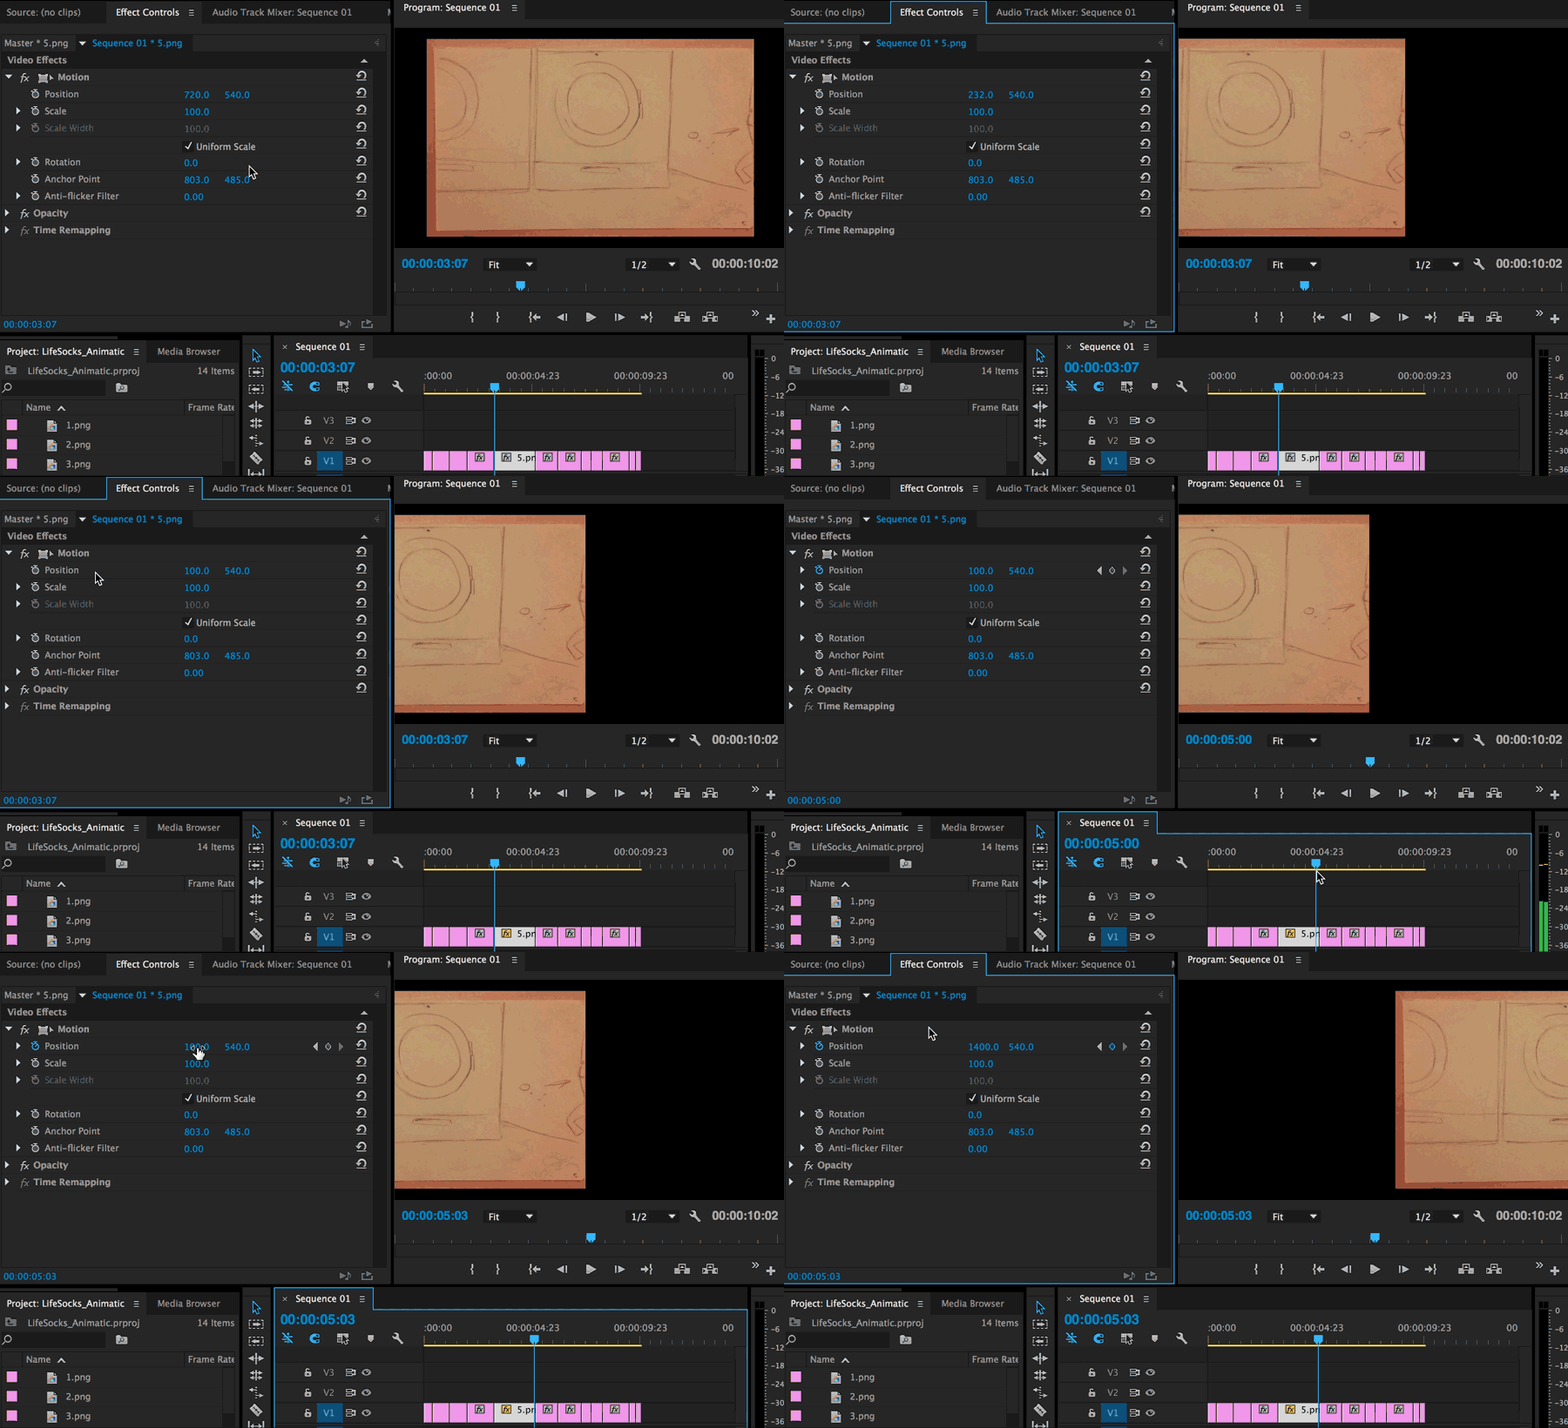
You may notice that there's an unsightly black void when you pan left in right, both in the gif above and in the example storyboard when you try panning. This is fine for first pass storyboards and animatics, but in your final animatic we would expect you to draw an extra long (or extra tall) frame so that the pan is a continuous image.
INSERTING AUDIO FILES
After you've finished manipulating your video clips, you'll want to add sound to your almost-finished animatic.
There's many sites out there where you can get royalty free music and sound effects. Personally, I like to use freesound.org. Download your sound files as appropriate, and we'll import them into our Sequence as we did for the images. Drag them into the Audio (A1, A2, or A3) Timeline.
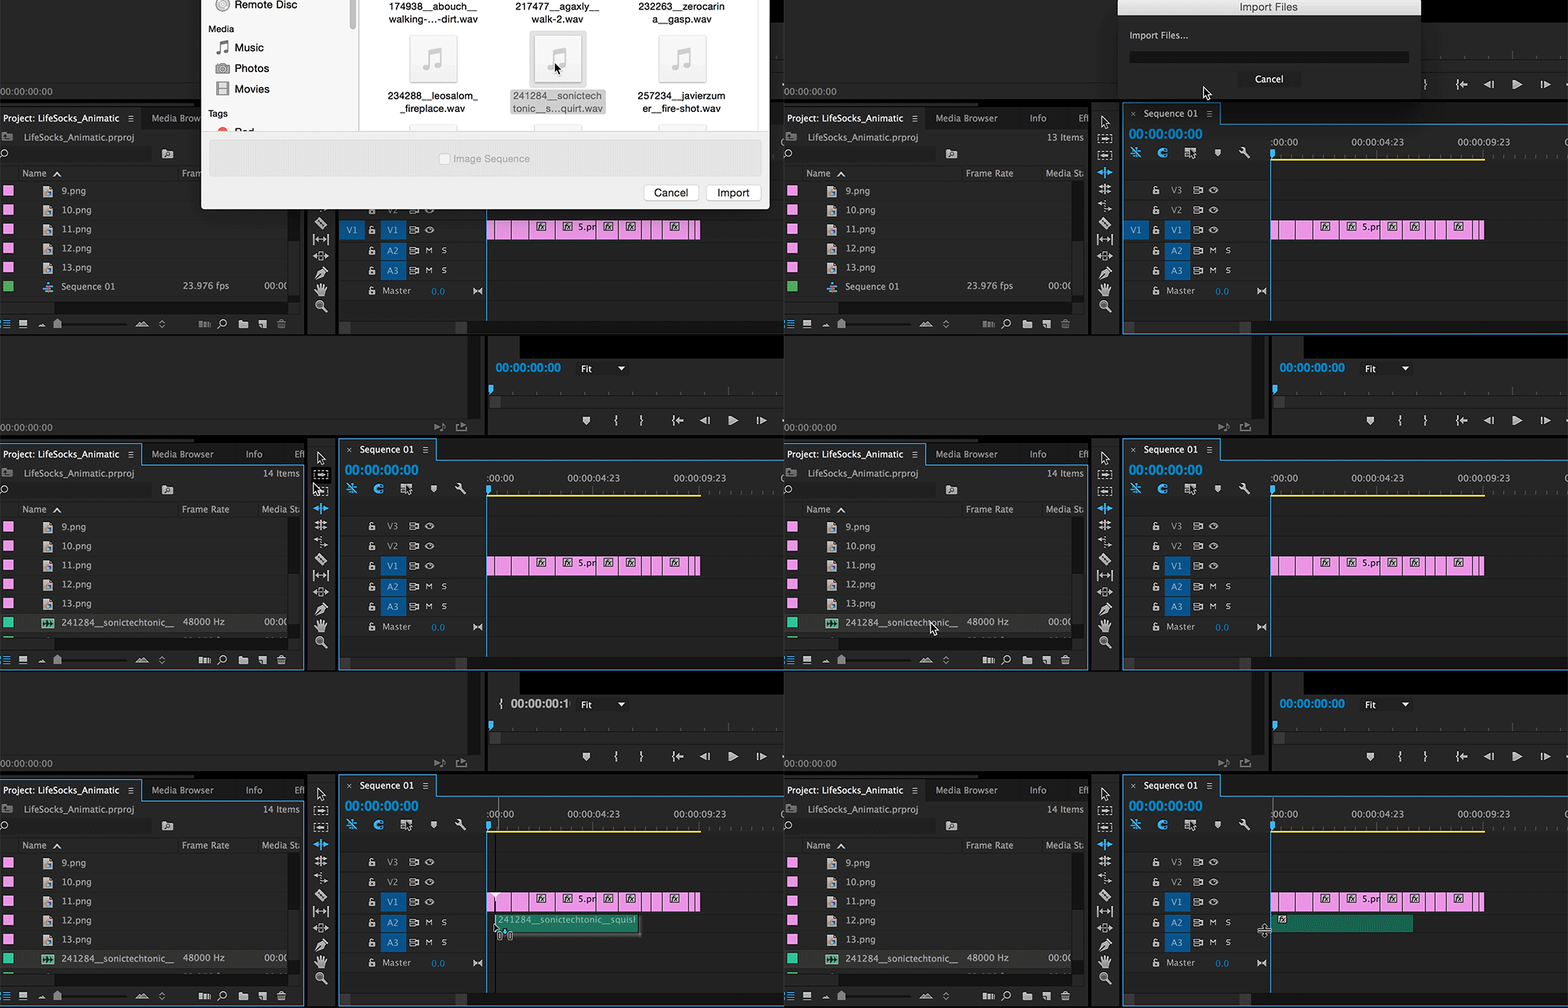
And just like your image files, you can import all the appropriate sounds for your videos. This is where the different layers (A1, A2, A3, etc.) come in handy. Much of the time, there will be more sound than depicted action. For example, when my character stands up and closes the door of the washing machine, there will almost simultaneously be a sound of a door closing and a person stepping on the floor to get up. So, with this, I will layer my two different sounds and stack them on top of each other, consistently going back and forth with my time slider to check if my sounds are in the right areas and adjust acorrdingly.
This is usually the part where I turn off the Snap (magnet) function so I could get really precise with my sound.

Be sure to avoid having any gaps of silences (the image above has a small gap of silence), because silences are very, very harsh and jarring. If there are no sound effects at that time, be sure to have at least a background noise sound that is consistent with your story setting.
Additionally, if you find that you need an extra layer of audio because, alas, you forgot your background sound, you can always add an audio track by right clicking one of the tracks (such as A1) and "Add Track"

You can easily manipulate the audio tracks just as you can manipulate the video tracks. So, if you want to get really precise with your audio and only want a certain part of it to play, you can zoom in, use the razor tool, cut the specific part of the picee out, and delete it. And, like the video layers, you can scroll down to see the audio attributes, like so:
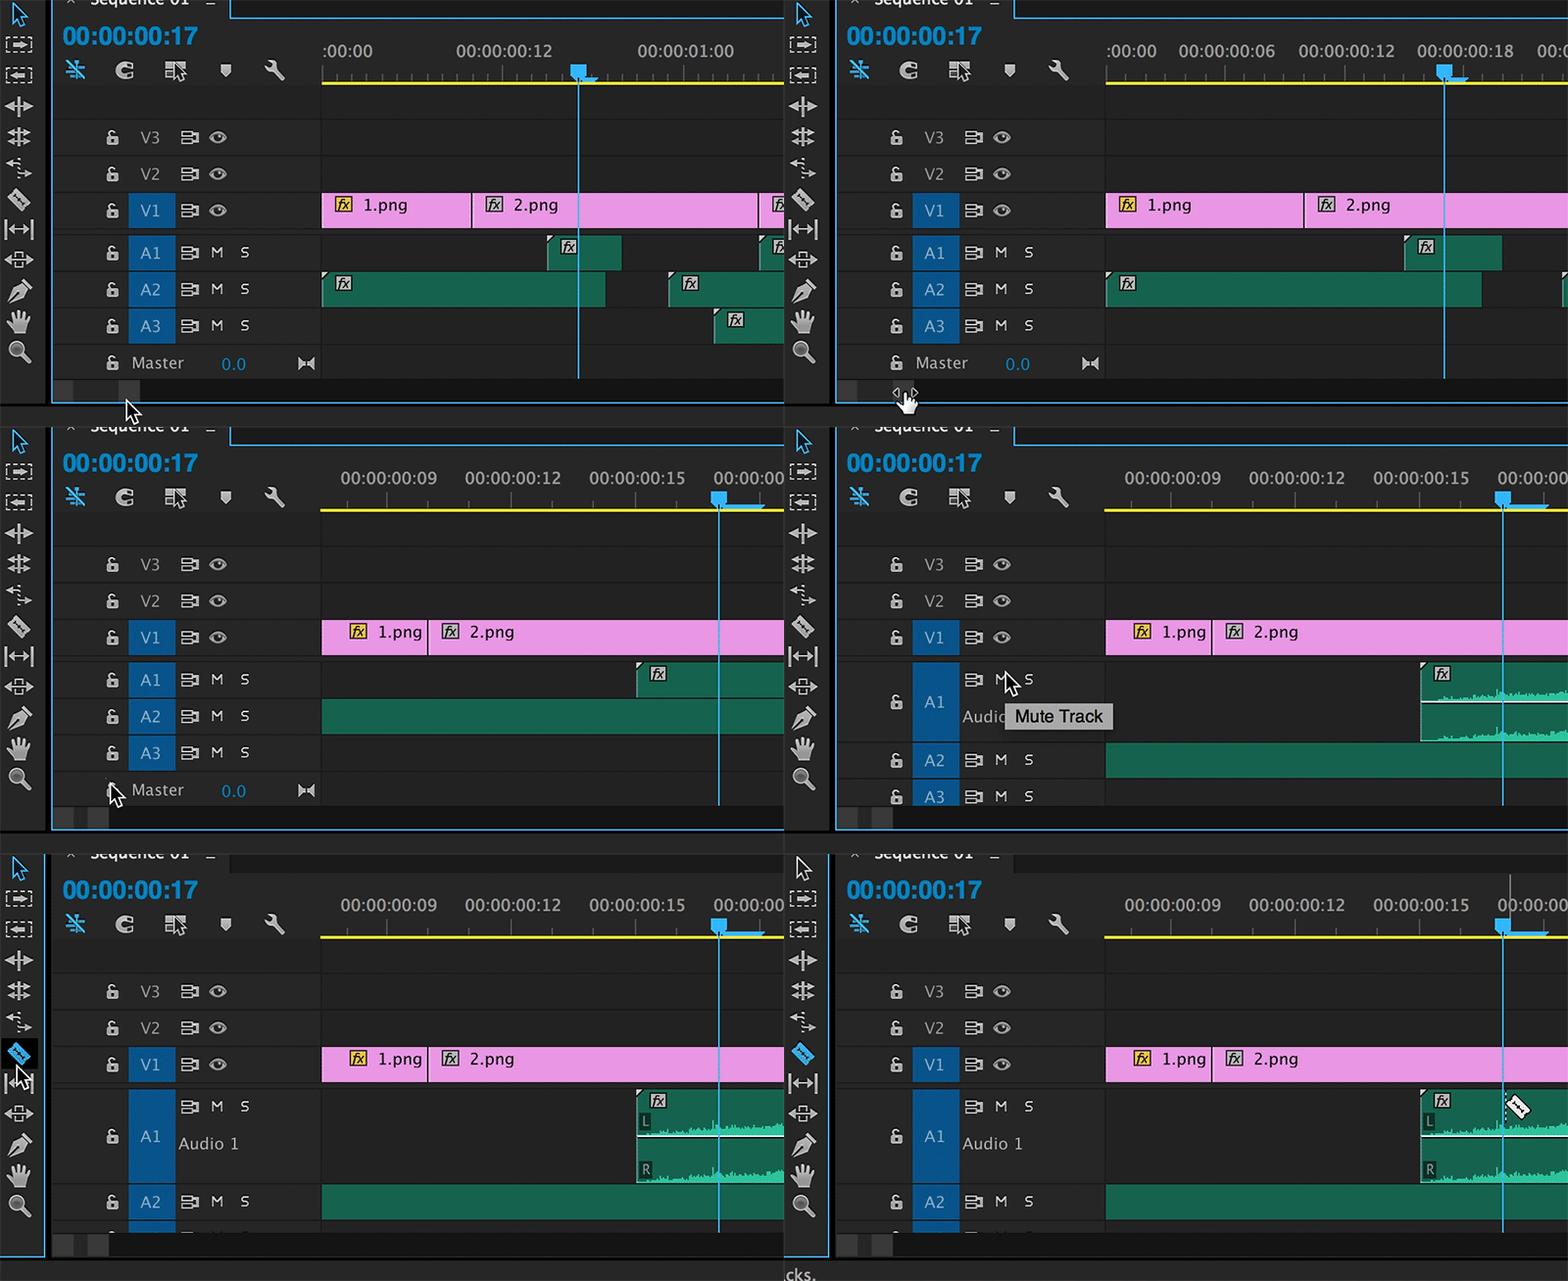
Please make sure that, as you are playing back your sound, it does not surpass the -18 dB mark. A good level to keep your sound at is about -24 dB so that, when we play it out loud, the sound is not too jarring. To adjust the volume of your sound clip, you can expand the audio track and click and drag down the white bar that separates the L and R.


GOOD!
BAD!
EXPORTING THE ANIMATIC
Now that you've completed your animatic, it's time to export your file! File > Export > Media
You want to keep your format to H.264, and, with that, you should not need to change your audio / video settings, but do make sure that you check "Export Video" and "Export Audio," and change the name of your file to STORYTITLE_ANIMATIC_YOURNAME.
For the example storyboard assignment , just name it PREMIEREINTRO_YOURNAME.

Finally, click "Export" to render your .mp4 file! Double check to make sure that you have a playable .mp4 file with no glitchiness, and not an uncompressed .avi file!
Congratulations! Now you're finished with your first animatic! Submit it to us as per the instructions given in class or on the lectures slides!
Be sure to e-mail us at adfa@ucbugg.com or come to office hours if you have any questions or if you get stuck on any part of this guide, and we will get back to you as soon as we can.